Let's Draw Insulator Markings
by Jack H. Tod
Reprinted from "INSULATORS - Crown Jewels of the Wire", October 1972, page 2
Many collectors wish to record insulator markings in their files or
correspond about them with other collectors or the magazine, and here are three
good methods which are easy to do and which are much better than photos.
Number 1. Place a piece of new and smooth aluminum foil over the marking,
fuzzy side up if for use in making photos later. Now go over entire marking by
repeatedly pressing down on it (hard) with the eraser on a pencil end. Do not
allow foil to slip while doing this.
This method is the one recommended for mail reporting of new markings as even
the most minute detail shows up in the foil reproduction. To avoid squashing it
in the mail, place a puddle of glue on the back side and allow to dry
thoroughly, a day or more. Then tape an end of it to your letter in a position
where it will end up in the lower left hand corner of the envelope away from the
canceling roller at the Post Office. If you're in a hurry and can't wait for
the glue to dry, cut out a hole in some thick cardboard and tape the foil to it
so the marking is over this hole. Smaller foils may also be mailed by putting
them inside the plastic silver dollar 2 x 2 coin holders.
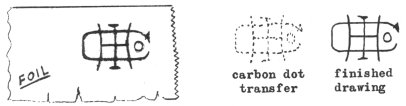
To transfer the marking from an insulator to a sheet of paper, first make the
foil impression. Now place carbon paper over your drawing and the foil on top of
that. Use a pencil point to repeatedly poke along the marking on the foil to
produce a series of carbon dots as shown above. Connect up these dots, and add
exact detail as you see it on the actual insulator.
Number 2. A carbon impression (rubbing) can be made for file use or general
description, but exact details and line widths don't show up as in foil
impressions.

Make a 3-layer sandwich of paper, carbon and paper again. Place
this over the marking and rub entire area with the smooth round plastic end of a
ballpoint pen. This gives a clear imprint on bottom paper as shown here
(retouched here for emphasis in magazine photo). If you are making this for
later photoing (as in the magazine) use black carbon paper as blue will not
reproduce.
To transfer this marking to your insulator drawing as was done in last
month's article, place the rubbing under the drawing and trace it with your
light-box. If you do not have a light-box or a glass top table you can put a
lamp under, transfer the marking to your drawing by using carbon paper and
tracing over it.
A small light-box is so handy, you may want to make one. Lazy man's version
is a piece of glass supported on two stacks of books. First class is any flat
wooden box, light bulb mounted inside, piece of plate glass on top.
Number 3. The above methods will not work on porcelain insulators with
underglaze markings nor on ones with incuse or embossed markings which are
rendered depthless because of glaze application, but we do have a way.

Place a piece of cellophane over the marking and trace the marking with a wax
pencil like you use on freezer tape or the like. It is difficult to get exact
detail right while you are doing this since the wax pencil marks are hard to see
over the actual marking. However, when you transfer the marking from the
cellophane to your drawing or other paper with either the light-box or with
carbon paper, you can adjust the wobbly lines and make the marking agree exactly
with that on the insulator itself.
Photos. Photos of markings are useful if you happen to have a SLR camera or a
portrait attachment for others. Adjust lighting from side to give most contrasty
view to embossings on glass or porcelain surface. It is very difficult to get
good photos on some porcelains - notably incuse or embossed markings on white
glaze and underglaze markings on anything other than light colors.
Hold insulator so that marking surface is exactly parallel to the camera film
plane. Advise correspondent of size of marking by recording measurement of some
key feature such as overall length. A sketch is also useful to supplement photo
as small or indistinct details such as periods may not show in the photo print.
| 
)
)
)